Carve EQ
User interface
Building your sound
Sculpt tool
Select tool
Pencil tool
Pan view tool
Zoom view tool
Reference tool
Match tool
Edit mode & Stereo mode
Gain & Mix
Spectrum view settings
Snapin mode

Overview
Kilohearts' Carve EQ is a powerful graphic equalizer, with 31 third-octave bands and a versatile interface. Stereo processing is possible with both Left/Right and Mid/Side modes. Carve EQ has a workspace centric user interface provides many options for how to edit the equalization curve. The EQ Match Tool can be used to automatically match the equalization to a reference track.
User interface

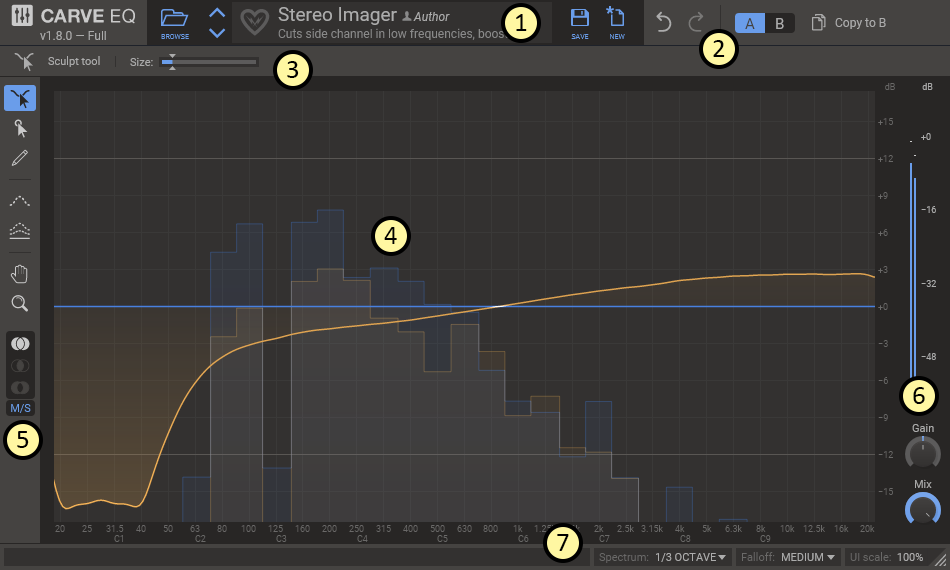
This is an overview of the plugin UI. It may look a bit overwhelming at first, but let's try to break it down a bit.
- In the top bar the name, author and description of the current patch is shown. By clicking the 'Browse' button you toggle the preset browser.
- The top bar also holds controls for Undo and Redo as well as the A/B configuration selector, which allows you to quickly switch between two different equalization setups to compare them.
- Just above the work area is a small bar containing options for the currently selected tool.
- In the middle of the UI you will find the main work area. It shows the equalization curve, as well as a real time spectrum analyzer of the processed audio.
- To the left of the main work area you will find a toolbar with small selection of tools. It also holds controls for which stereo channel you are editing, and whether the equalizer works in L/R or M/S mode.
- In the rightmost part of the work area you will also find a large VU meter measuring the overall volume of the processed audio, together with controls for overall gain and dry/wet mix.
- The very bottom of the window holds the status bar, which gives you tips about whatever your mouse is over at the moment. It also has controls for changing the appearance of the spectrum, and resizing or scaling the UI.
Building your sound
Once you have checked out some of the presets you are probably eager to get your hands dirty and create your own patches. We designed Carve EQ to be easy and fast to work with, and we hope you will enjoy experimenting and discovering the possibilities. Still, knowledge is power, so in this section we will go through all the features of Carve EQ in detail.
A graphic equalizer, like Carve EQ, works by designing a filter with a specific gain at certain bands on the frequency spectrum. Carve EQ allows you to work with 31 such bands, positioned at third octave intervals across the spectrum. The control points themselves s are only visible in Carve EQ when the Select tool is enabled. The other tools only let you manipulate the bands indirectly by editing the filter response.
Sculpt tool
The sculpt tool allow you to mold the frequency response in an organic and intuitive way. Simply grab the response curve with the left mouse button and drag it into the shape you want. You can adjust the size of the area affected by the tool by adjusting the slider in the tool options, or with the mouse scroll wheel. Two dashed vertical lines show the current size of the tool.
Select tool
The select tool gives you access to the individual graphic equalizer bands. When the tool is enabled a marker will appear on each of the 31 bands. The markers can be dragged up and down with the mouse. To improve the precision while dragging, hold the Shift key. Clicking a handle with the right mouse button will let you set it's gain value using your keyboard.
Several handles can be selected at once by clicking and dragging a selection rectangle around them. They can then be dragged together.
When one or more handles are selected you can press the the Delete to reset the selected bands back to 0 dB. If you are currently editing only one of the stereo channel the delete key will first reset the handles to whatever the other channel is set to, pressing the delete key again will reset the bands to 0 dB.
Pencil tool
Use the pencil tool to freehand draw your filter response. Simply click and drag with the mouse to draw.
Pan view tool
The pan view tool is used to pan the viewport along both the frequency and the gain axis. Simply click and drag to pan the view.
It is also possible to pan the view with any tool selected by clicking and dragging on the axis labels below and to the right of the viewport.
Zoom view tool
The zoom view tool is used to zoom the viewport along the gain axis. Simply click and drag to zoom the view.
It is also possible to zoom the view with any tool selected by scrolling the mouse wheel when hovering the axis labels to the right of the viewport.
Reference tool
The reference tool allows you to display an overlaid spectrum of another sound in the main work area. This can be useful in many ways, for example when trying to match the equalization curve of one song to another one, or during mixing when you want to avoid having two tracks clash in the same frequency range. Reference spectrums can be recorded and and later loaded from profiles which can be easily shared between different sessions.
The reference data can come from many different sources:
- Off
- Turns off the reference spectrum.
- Sidechain
- Displays the spectrum of the sidechain input in real time. (See our guide to setting up sidechains in all DAWs here)
- Factory profile
- Load one of the reference profiles bundled with the plugin.
- User profile
- Load one of the reference profiles you saved earlier.
- Create profile from file
- Create a reference profile from audio in a wav file.
- Record
- Record the current (main or sidechain) input to a profile.
Match tool
The match tool is a very powerful tool which allows you to automatically match the the equalization to a reference. You can use this on the master bus to match the frequency levels of your song to another one. It also works well on single instrument, to match the timbre of one instrument to another. You can also toggle the Invert option to carve out space in the spectrum of one track to avoid clashing with another one.

Using the match tool is a three step process:
- Input analysis
- Before the match tool can work it's magic it needs to know how its input sound sounds like. Press the Input Record button while playing your song and Curve EQ will start collecting data from the main input. The spectrum analyzer in the main work area will show the data collected so far while recording. Stop the recording when you have played the relevant part of the song.
The input profile that you record will be remembered by the plugin so you can use it several times. You must remember to update it if you want to use the match tool again after making any changes to your song.
- Target profile
- Now that the match algorithm knows how your input sounds like, it is up to you to choose what target profile to match your equalization curve to. This target profile is the same profile as in the Reference tool, and is loaded or recorded in the same way.
- Tweaking
- Once the input is analyzed and a target profile is chosen the matching tool with immedia_dynamictely create an EQ curve to match the input to the target, and you will hear the result. You then can tweak the resulting curve using the Detail and Amount knobs.
The detail knob adjusts the sensitivity of the algorithm across the frequency spectrum. A higher setting will be needed to pick out narrow frequency peaks, while a lower setting will match the equalization curve with more broad brush strokes.
The amount knob mixes the result of the matching algorithm with a flat 0 dB equalization curve. This allows you to dial back the matching effect a bit if it's too extreme.
Finally, there is an option invert the matched curve, carving out frequency space in the input for the target profile rather than matching their curves.
The match tool will completely replace any equalization curve you had set before you started, but it does let you edit the resulting curve freely once you are done with the match tool.
Edit mode & Stereo mode
 Below the tools in the toolbar you will find controls for handling equalization in stereo.
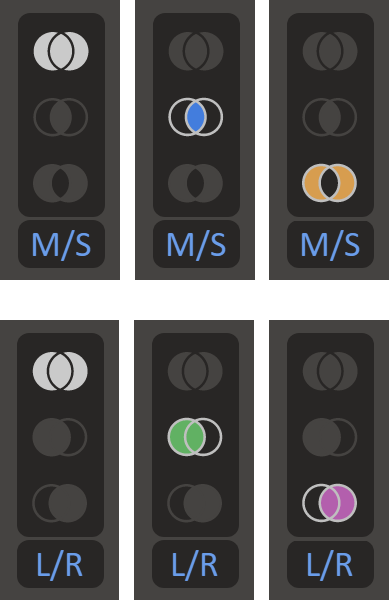
At the bottom is a dropdown that lets you choose if the equalizer works in Left/Right or Mid/Side mode. The Left/Right mode will let you apply different equalization to the left and the right channels. The Mid/Side mode, on the other hand, will let you equalize the mono content (mid) separately from the stereo content (side).
On top is the edit mode selector. It lets you choose what channel to edit with the edit tool. By default it is set to "both channels", but you can change it to left, right, mid, or side to only edit that channel. Instead of clicking, you can also toggle the current edit mode with the Tab key.
Gain & Mix
In the bottom right corner you will find the Gain and Mix knobs.
The Gain knob adjusts the overall gain of the equalizer. You can use this to compensate for your equalization inadvertently making the overall volume louder or softer.
The Mix knob scales the gain of all bands, scaling it down to 0 dB at 0% mix.
Spectrum view settings
In the status bar you will find two dropdowns which can be used to tune the look of the spectrum.
- Spectrum mode
- Adjusts the frequency resolution of spectrum analyzer. Select between octave or 1/3 octave bars, and exact which shows a continuous curve.
- Falloff
- Adjusts how quickly the spectrum falls off to zero when the sound goes silent.
Snapin mode
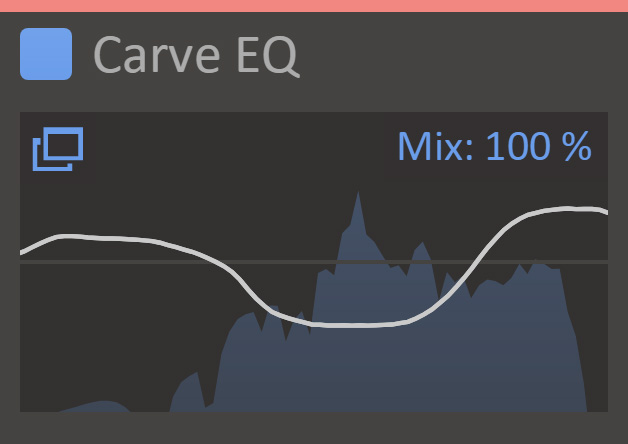
 Carve EQ can also be loaded as a Snapin in Snapin hosts like Snap Heap, Multipass or Phase Plant. In this mode, the Snapin interface shows a preview of the EQ curve, along with Offset, Gain and Mix knobs. At the top, up/down arrows can be used to scan through presets and a full browser can be opened by clicking the preset name. To edit the current patch, press the pen icon. This will open the full Carve EQ interface in a separate window.