Phase Plant
User Interface
Generator Area
Analog Oscillator
Granular Generator
Noise Generator
Sample Player
Wavetable Oscillator
Distortion Effect
Filter Effect
Non-Linear Filter Effect
Mix Routing
Aux Routing
Envelope Output
Curve Output
Generator Groups
Audio Rate Modulation
Effect Lanes
Voice Settings
Unison Settings
Overview

Phase Plant is a modular synthesizer where you can combine several different synthesis techniques in your sound design. Analog oscillators, samples, wavetables, a granular engine, and a noise generator create the initial sound, which can then be filtered and processed using any combination of Snapins from your Kilohearts arsenal. To bring your patch to life, Phase Plant supports an open ended modulation system, where you can add envelopes and LFOs as you need them and route them to almost any parameter. To top it all off, audio rate modulations can be used to modulate the phases, frequencies, and amplitudes of all generator modules, to create all manner of sounds based on FM and similar techniques.
User Interface
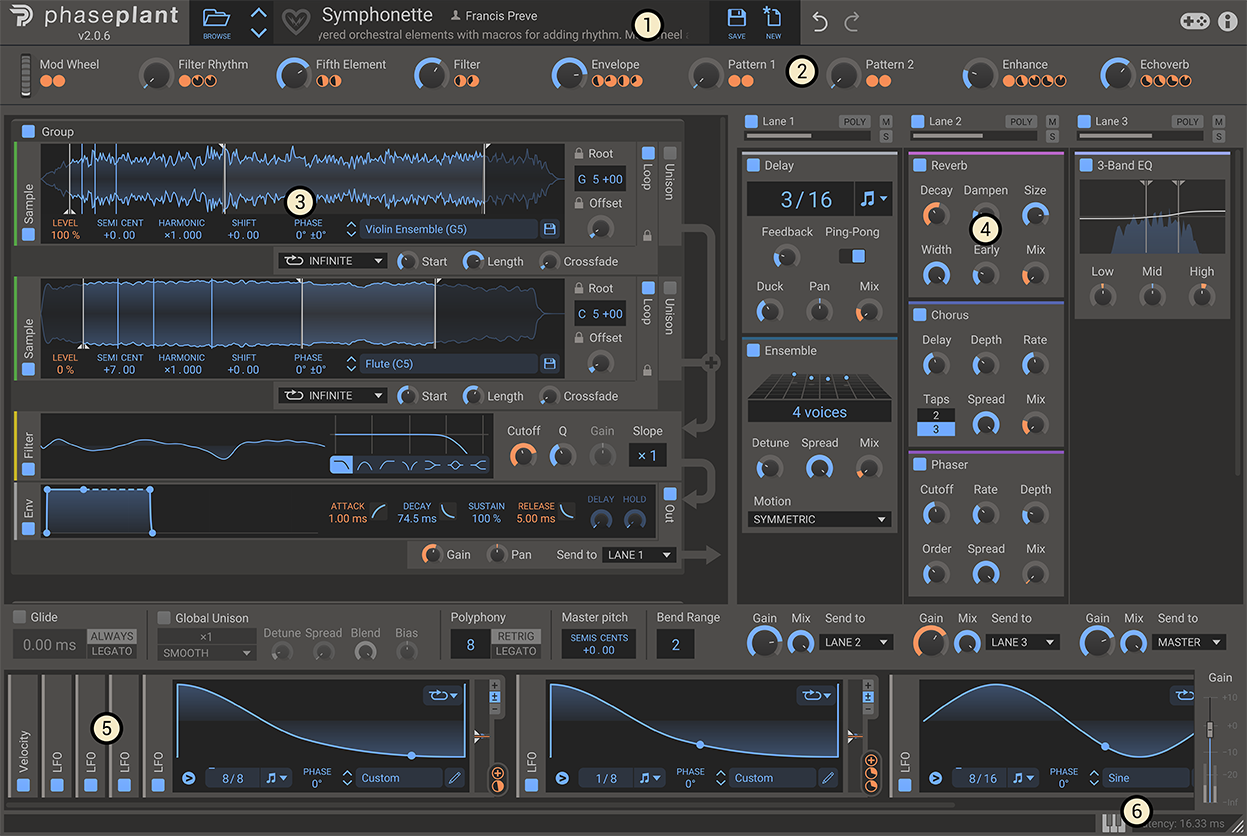
This is an overview of the plugin user interface (UI). It may look a bit overwhelming at first, so let's try to break it down a bit.
- In the top bar, the patch/preset name, author and description of the current patch is shown. By clicking the 'Browse' button, you toggle the preset browser. To the right you will find 'Undo' and 'Redo' buttons, allowing you to undo or redo all actions in Phase Plant.
- The eight large knobs under the patch name are known as the macro knobs. These knobs can be routed by the sound designer to control any other parameters in the patch in order to provide a few easy-to-reach knobs for tuning the sound of the patch. A single macro knob can even be routed to several parameters.
- To the left below the macro knobs is the generator area. This is where you set up your signal generation with the help of different oscillators and sound generators. Click in the dotted area in the unused generator space to add modules.
- The area to the right of the generators holds the Snapin lanes, which is where you add your effects. Each lane can hold multiple Snapins. Adding new Snapins is as easy as clicking the empty space at the bottom of a lane, or by clicking the space above or between existing Snapins.
- Along the bottom of the Phase Plant window is the modulation area. From here you can modulate parameters of your patch using LFOs (low frequency oscillators), Envelopes, MIDI input, and more.
- Clicking on the little keyboard icon in the status bar will reveal the on-screen keyboard. It can be used to play notes by clicking on the keys, and it will also show what notes are being played by incoming MIDI messages.
Generator Area
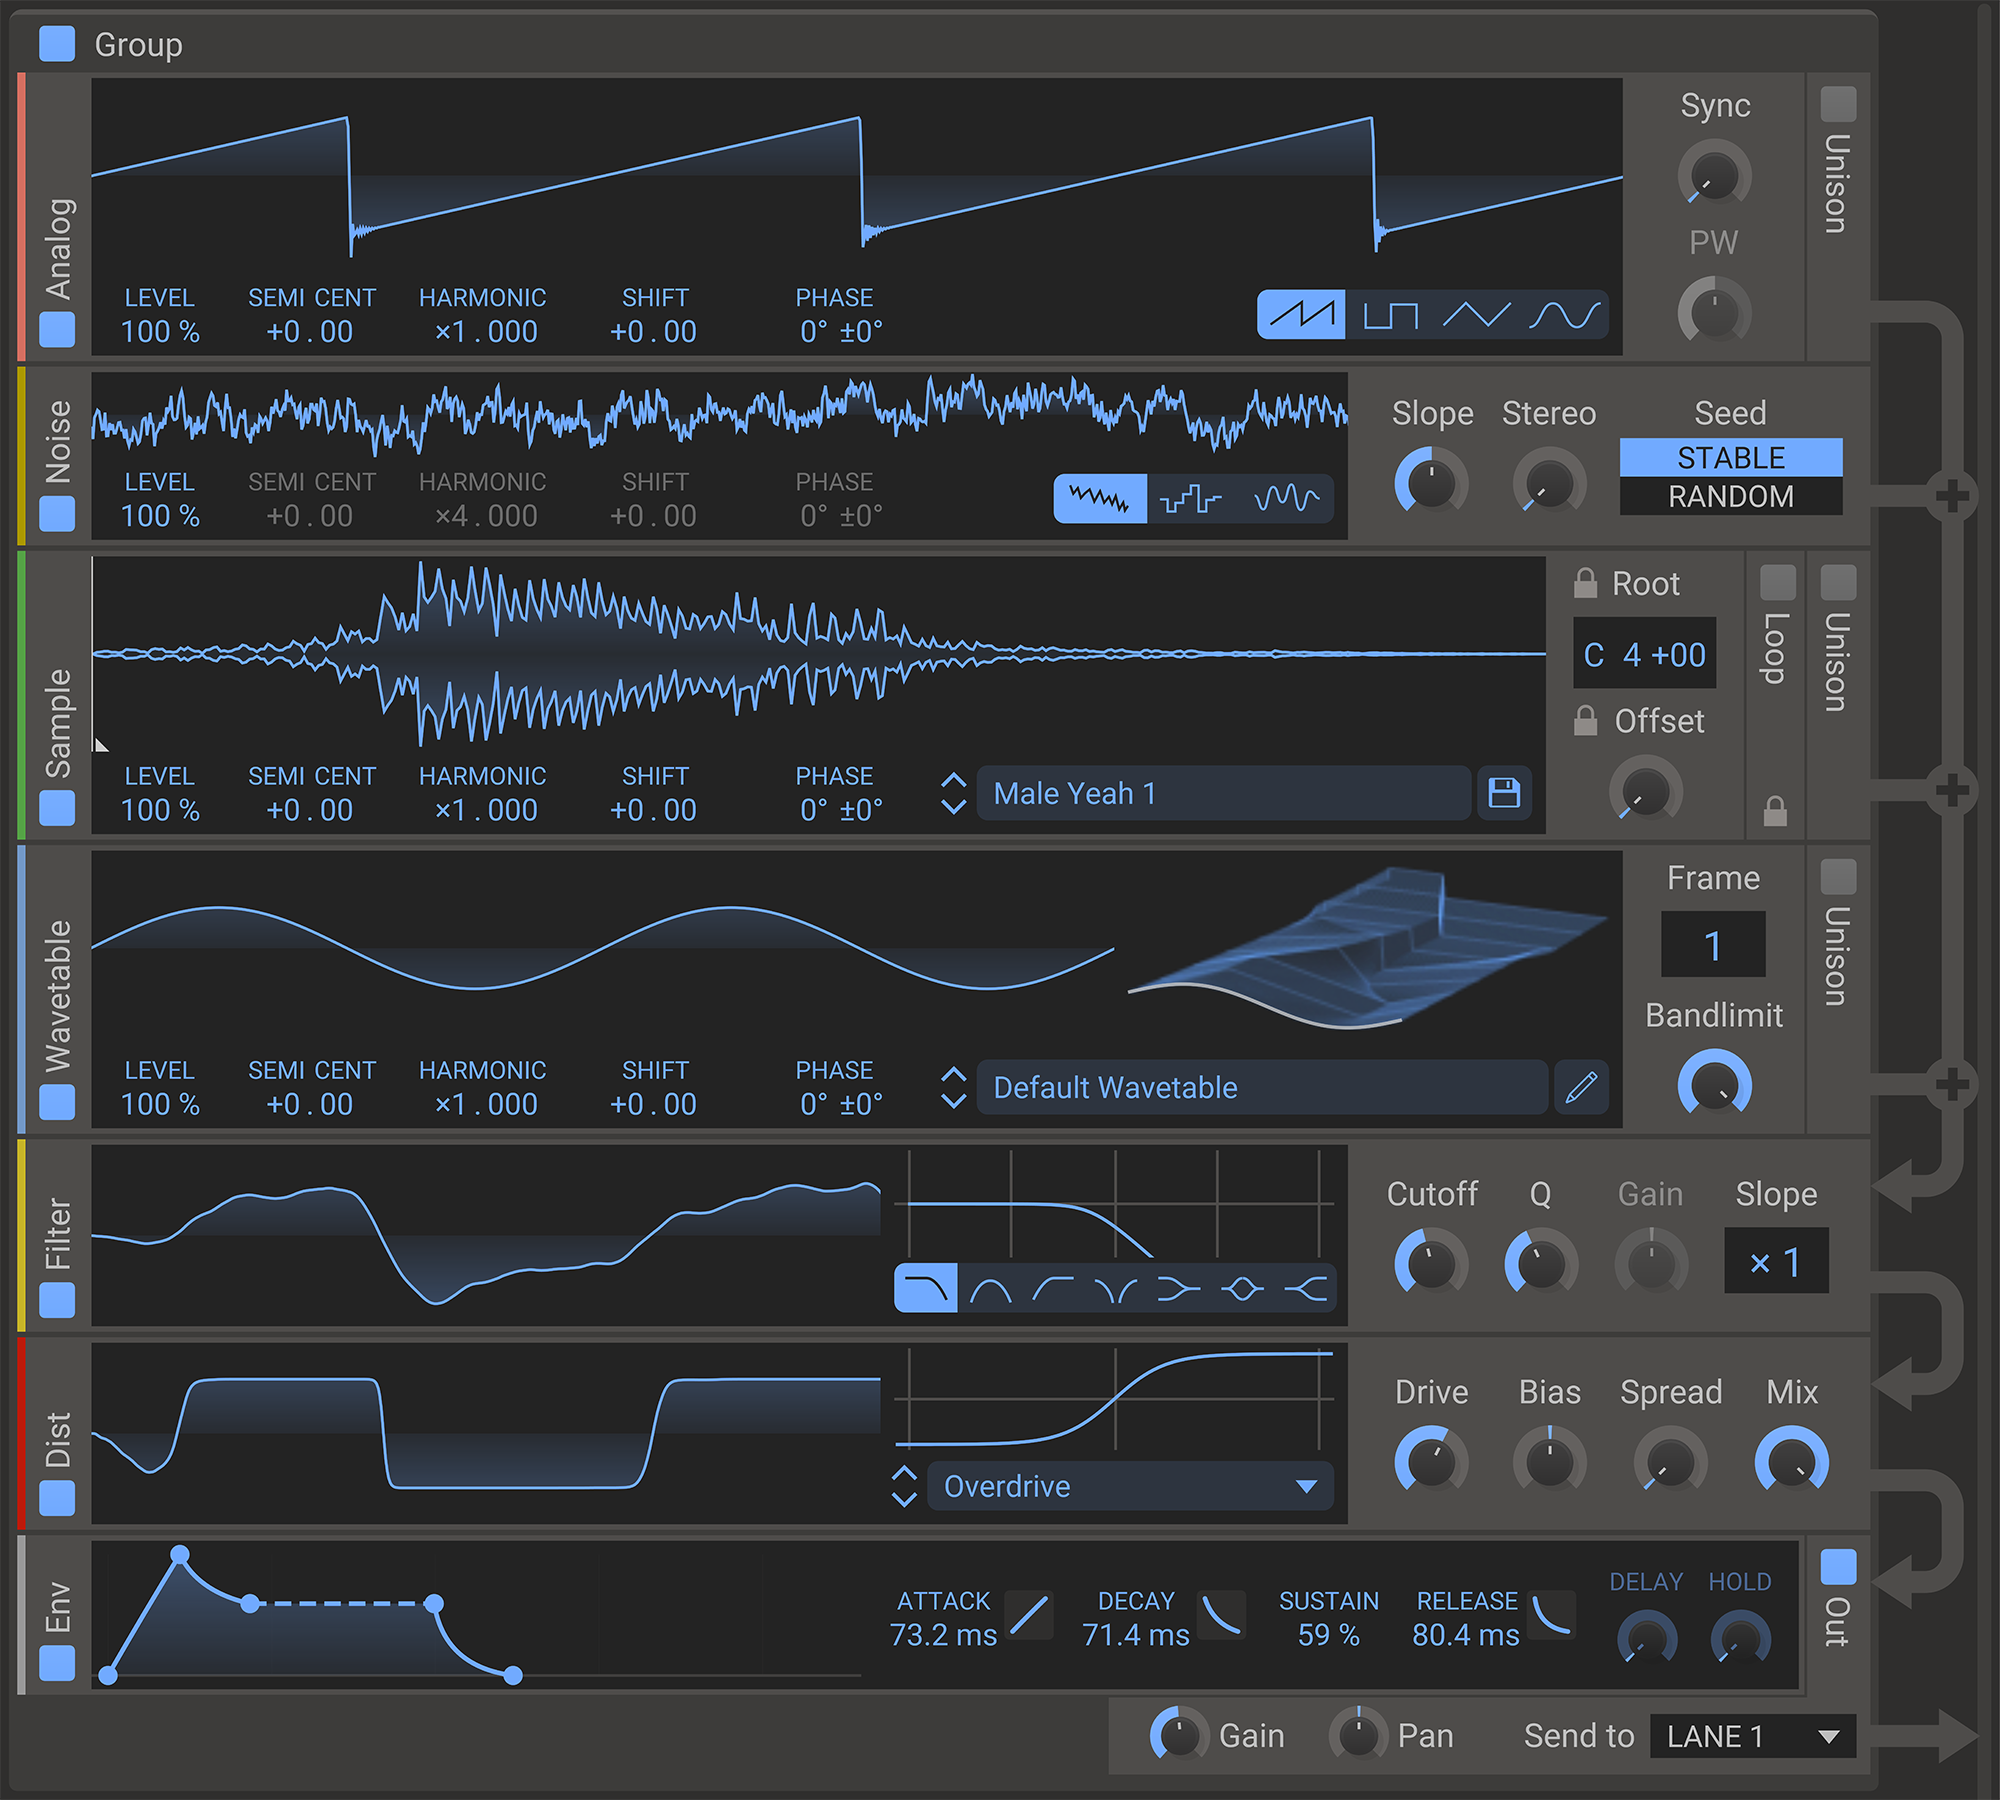
This is where your sound is generated, modulated and filtered before you pass it on to the effects. Like most things in Phase Plant, the generator area uses a modular approach, where you add modules one by one to gradually build up your sound. You have several different modules at your disposal in the generator section. Some of them are oscillators that can generate a plethora of waveforms, and you also have access to a limited number of filters and effects, as well as some utility modules.
 Each module in the generator section will show a visual representation of the sound that it outputs. Most parameter changes or modulations you perform will be reflected by changes in these scopes. The data for the visalizations is generated using the same signal path that creates the actual sound, but the frequency is fixed and the visualization does not track the played note.
To add a module, click on the large dashed area that appears at the bottom of the generator area. A popup menu will appear where you can select what kind of module you want. The first time you add a generator module, a group and an output module will be added automatically as well. The generator area can hold up to 32 modules.
Once added, modules can be moved and copied by dragging and dropping. Hold ctrl/command while dragging to make a copy with.
The generator modules are the modules that actually produce the sound in Phase Plant. There are five different kinds: the analog oscillator, the noise generator, the granular engine, the sample player, and the wavetable oscillator. All of these sound sources are keytracked, meaning that their frequency depends on what note you are playing.
Generator modules automatically route themselves in the module stack by mixing their output on top of the signal coming from above. Some modules in the generator section require input from an above module. If you accidentally place one such module at the top of a group, a red arrow will show indicating that some module is missing above.
All generator modules also share a few parameters which are described below.
- Level
- The amplitude of the generator. The volume is scaled by this value, which ranges from 0% to 200%.
- Pitch (Semi, Cent)
- The pitch offset from the played note expressed in semitones and cents. This setting can be used to make this generator play a pitch which is a set interval from the played note. For example, to play one octave higher, set this parameter to +12.00, to play one octave lower, set it to −12.00. You can also use the cent part to fine tune a generator.
- Harmonic
- This setting is similar to the pitch parameter, but it is expressed as a multiplier. The frequency of this generator is multiplied with whatever this parameter is set to. For example, to play this generator at four times the frequency, set this to x4.000, which corresponds to a relative pitch increase of two octaves. You can also set this parameter to x0.000, which will completely turn off keytracking for this generator. The frequency can then be set with the Shift parameter.
- Shift
- The shift parameter applies a fixed detuning expressed in Hz (cycles per second) on top of the frequency computed after applying the Pitch offset and harmonic multiplier. The shift can both be positive and negative. The shift can even push the final frequency of the oscillator below zero, which is allowed and will result in the generator running backwards in a sense.
- Phase
- The phase has two distinct values, phase offset and phase randomness.
The first is noted by a '°' sign and adds a fixed phase offset to the output. It can be used to set what phase an oscillator starts at.
The second is shown a +/- a number of degrees and adds randomness to the phase offset for each played note. If you use several oscillators, this will cause them to sometimes start in phase, and sometimes out of phase. If you are using unison, then this setting will randomize the phase of each unison voice individually.
Analog Oscillator

The analog oscillator is one of the generator modules, and it's probably also the generator that is easiest to understand and get started with. The goal of the analog oscillator is to reproduce a few classic waveforms with as high fidelity as possible. The Analog Oscillator is a great choice for presets based on subtractive synthesis techniques, and it also performs really well when FM is used.
This generator supports unison, which is described in detail in the unison chapter.
- Waveform
- Selects what waveform the oscillator plays. Sawtooth wave, pulse wave, triangle wave, and sine wave are available.
- Sync
- Simulates oscillator sync by running the oscillator at a higher frequency, but resetting its phase back to zero at the normal frequency.
- PW
- Adjusts the pulse width of the pulse waveform.
Granular Generator
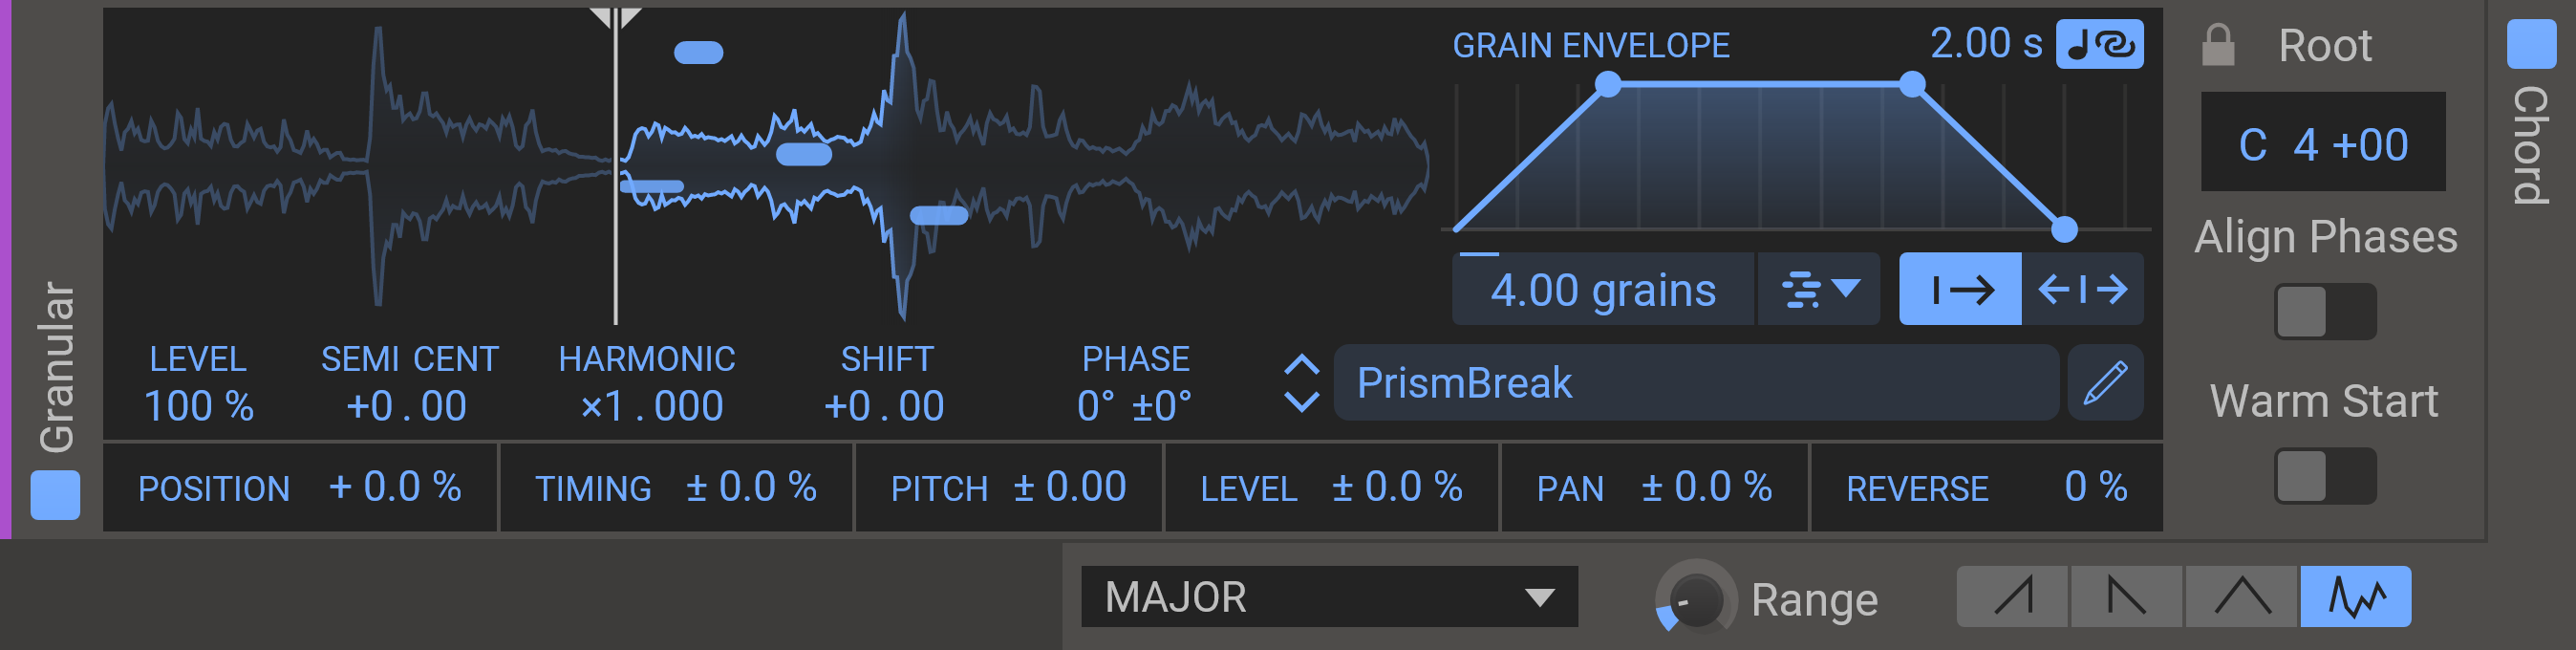
The granular generator is a generator module which plays several short snippets from a sample, called grains. It will play the sample at different pitch depending on the played note, in short grains starting at the current play cursor position. You can load any sample you like into the granular by browsing for it or by dragging and dropping it onto the granular module. Phase Plant also comes bundled with a library of samples that you are free to use as you see fit.
Instead of showing a oscilloscope of the waveform, like the other modules, the granular generator will show a visual representation of the loaded sample. This view will also allow you to drag the play cursor, and will visualize all playing grains.
- Sample Selector
- The name of the currently loaded sample is shown in the field below the sample view. Clicking the name will open a browser to let you load a sample from the sample library. You can step through the samples very conveniently by clicking the up and down arrows. In the browser you can also add your own user folders to the library.
- Edit Button
- Clicking the edit button opens the sample editor. Saving the sample through the sample editor will save the current root note in the sample file as well.
- Play Cursor
- You can control the position where grains start to play by adjusting the play cursor in the sample view.
- Grain Length
- You can adjust the length in milliseconds of each grain. If you enable length keytracking then the length will automatically adjusted to the played pitch, so that high pitched voices will use shorter grains. This makes the grains cover the same section of the sample regadless of what note is played.
- Grain Envelope
- An amplitude envelope will be applied to each grain as it is played. The envelope will be stretched to cover the whole lifetime of the grain, set by the grain length parameter. You can adjust the attack and decay times of the envelope, and the curvature of the attack and decay curves.
- Grain Spawn Rate
- The grain spawn rate can be adjusted in three different modes.
- Free Rate
- Grains are spawned at a fixed rate set in Hz.
- Synced Rate
- Grains are spawned at a tempo synced rate set as a note length.
- Density
- Grains are spawned at a rate computed automatically to hit a certain number of simultaneously playing grains. Adjusting the length of the grains will thus change the grain spawn rate.
- Root
- To be able to play the sample at the correct pitch, the fundamental frequency of the sample must be set. While you adjust the root pitch, two zoomed portions of the sample will appear, taken one cycle apart from the sample. You can use this to help you tune the sample by eye in addition to tuning it by ear. When the blue and the grey waveform align, with one cycle inbetween the white bars, the sample is in tune.
- Align Phases
- When Align Phases is enabled the granular engine will nudge the position of each grain so that they are in phase with each other in regards to the fundamental frequency of the sample. For this to work the sample must have a clear fundamental frequency, and the root note must be tuned correctly.
- Warm Start
- When Warm Start is enabled new voices will have all grains running when a note is struck, instead of having them spawn in one at the time over a period. This will give you a full sound immediately when striking a note.
- Randomizations
- At the bottom of the granular module are a row of parameters that randomizes the behaviour of each grain, making each grain unique, which gives variation and lushness to the sound.
- Random Position
- Randomizes the starting position in the sample of the grains.
- Random Timing
- Randomizes the start time of each grain.
- Random Pitch
- Randomizes the pitch of each grain.
- Random Level
- Randomizes the volume of each grain.
- Random Pan
- Randomizes the stereo panning of each grain.
- Random Reverse
- Sets the probability that a grain will be played in reverse.
- Chords
- You can enable the chord feature of the granular generator, which selects the pitches of the grains according to a certain chord.
- Chord
- Select what chord you want from the dropdown. There are also some options which are not chords, strictly speaking.
- Chord Range
- The range knob adjusts how many notes from the chord to use, measured in number of octaves.
- Chord Picking Pattern
- Selects a strumming pattern for the chord; up, down, up-down or random.
Noise Generator

Noise can be used to synthesize inharmonic elements like drum hits or wind. The noise generator supports three different types of noise, two of which are keytracked.
- Noise type
- Selects noise type. The options are colored noise, stepped keytracked noise, and smooth keytracked noise.
- Slope
- Adjusts the falloff of the spectrum for the colored noise. Ranges from flat (white noise), through –3 dB/octave (pink noise), to –6 dB/octave (brown noise).
- Stereo
- Blends between mono and stereo noise.
- Seed
- Selects between having the same noise sequence for each note (Stable) or a different one each time (Random)
Sample Player

The sample player is a generator module which allows you to use sampled audio as a building block in your generator stack. It will play the sample at different speeds depending on the played note, which of course also adjusts the pitch of the sample. You can load any sample you like into the sampler by browsing for it or by dragging and dropping it onto the sampler module. Phase Plant also comes bundled with a library of samples that you are free to use as you see fit.
Instead of showing a oscilloscope of the waveform, like the other modules, the sampler will show a visual representation of the loaded sample. This view will also allow you to drag the offset and adjust the loop points.
This generator supports unison, which is described in detail in the unison chapter.
- Sample selector
- The name of the currently loaded sample is shown in the field below the sample view. Clicking the name will open a browser to let you load a sample from the sample library. You can step through the samples very conveniently by clicking the up and down arrows. In the browser you can also add your own user folders to the library.
- Save button
- The save button next to the sample name lets you save the current sample. The root, offset and current loop is saved in the sample file as well.
- Root
- To be able to play the sample at the correct pitch, the fundamental frequency of the sample must be set. While you adjust the root pitch, two zoomed portions of the sample will appear, taken one cycle apart from the sample. You can use this to help you tune the sample by eye in addition to tuning it by ear. When the blue and the grey waveform align, with one cycle inbetween the white bars, the sample is in tune.
- Offset
- The offset parameter adjusts the starting position of the playback in the sample.
Samples can be looped in several different ways, which is controlled by the parameters in the rightmost panel.
- Loop Mode
- Selects different kinds of looping. Infinite will loop forwards forever, sustain will loop forwards until you release the key and then keep playing without looping, ping pong will alternate between playing the looped region forwards and backwards, and finally reverse will play the loop only backwards.
- Start
- The loop start point.
- Length
- The length of the loop. As you adjust this, you will see a zoomed in portion of the sample around the loop start point (grey curve) and the loop end point (blue curve). You can use this visual feedback to find a seamless loop point by aligning the two curves. Remember that holding the shift key while dragging will enter fine-tuning mode.
- X-Fade
- To avoid clicks and pops when the loop wraps around, Phase Plant supports crossfading across the loop boundary. This parameter adjusts the length of the crossfade region.
Wavetable Oscillator

The wavetable oscillator is a very versatile generator module. It can replicate pretty much any waveform you can think of. It is backed by a wavetable, which contains 256 frames, each one holding a sampled waveform 2048 samples long. By modulating the current frame over time, all sorts of interesting movement can be created.
A versatile library of wavetables is included with Phase Plant, and you can also use wavetables from other sources if they are in a compatible format. Finally, you can create or edit wavetables with the included wavetable editor. Phase Plant can load wavetables from wav and flac files, provided they have the right length (256 × 2048 = 524 288 samples). Furthermore, the wavetable editor has a tool for converting any sample to a wavetable.
The wavetable editor is described in detail in the wavetable editor chapter.
This generator supports unison which is described in detail in the unison chapter.
- Wavetable selector
- The name of the currently loaded wavetable is shown in the field below the wavetable view. Clicking the name will open a browser to let you load a wavetable from the wavetable library. You can step through the wavetables very conveniently by clicking the up and down arrows. In the browser you can also add your own user folders to the library. Read more about the Kilohearts Wavetables.
- Frame
- Selects what frame in the wavetable to play back.
- Bandlimit
- Bandlimits the wavetable using a very sharp internal low pass filter. This feature can be use to tame a wavetable which is under heavy phase modulation, since the filter is applied before the phase modulation.
Distortion Effect

The distortion is an effect module that distorts the incoming signal from the modules above it. It is a lightweight version of the Snapin with the same name. Since it lives in the generator area, it can also partake in audio rate modulation, both as a source and as a target.
If an effect in the generator area has a red arrow on its right, it means it lacks any input. Make sure to place it below a generator module, or similar, in your signal path.
- Type
- The flavor of distortion. Select between overdrive, saturate, foldback, sine, hard clip, and quantize.
- Drive
- The drive setting will boost the input signal, causing a heavier distortion.
- Bias
- The bias will add a DC offset to the signal before distorting. Adding some bias can prevent the distorted audio from sounding hollow and uninteresting.
- Spread
- The spread will add a variable amount of bias to the left and right channels. This can give some nice and subtle stereo widening.
- Mix
- The dry/wet mix of this effect. A lower value will let some of the unmodified signal pass through.
Filter Effect

The filter is an effect module which can apply a variety of filters to the incoming signal from the modules above it. It is very similar to the filter Snapin in terms of capabilities, but since it lives in the generator area, it can also partake in audio rate modulation, both as a source and as a target.
If an effect in the generator area has a red arrow on its right, it means it lacks any input. Make sure to place it below a generator module, or similar, in your signal path.
- Type
- The type of filter. Select between low pass, band pass, high pass, notch, low shelf, peak, and high shelf filters.
- Cutoff
- The operating frequency of the filter. In a low-pass filter, this is the frequency where the signal is reduced by 3dB.
- Q
- The filter Q setting. High values for Q will make the filter resonate at the cutoff frequency.
- Gain
- The gain value for the low shelf, peak, and high shelf filter types.
- Slope
- The slope of the filter cutoff, with 1x representing a classic 2-pole filter and 2x behaving like a 4-pole filter.
Non-Linear Filter Effect

The non-linear filter is an effect module which can apply a variety of filters to the incoming signal from the modules above it. It is very similar to the Non-Linear Filter snapin in terms of capabilities, but since it lives in the generator area, it can also partake in audio rate modulation, both as a source and as a target.
If an effect in the generator area has a red arrow on its right, it means it lacks any input. Make sure to place it below a generator module, or similar, in your signal path.
- Type
- The type of filter. Select between low pass, band pass, high pass, notch, and all pass filters.
- Cutoff
- The operating frequency of the filter.
- Q
- The filter Q setting. High values for Q will make the filter resonate at the cutoff frequency.
- Drive
- Overdrives the filter, which makes the effect of the nonlinear behaviour more prominent.
- Mode
- Selects what flavor of nonlinearity you want. The clean mode has no nonlinearies, and does not color the signal. All other modes distort and color the signal in different ways to some extent.
Mix Routing

The mix module is a utility module that you can think of as an effect that only applies a gain to the signal. The most common use of the mix module is to mix together the output of several generator modules above it to use the mixed signal for audio rate modulation.
It also allows you to adjust the volume of a signal and invert it. Since the level can be the target for audio rate modulation, you can also use the mix module for amplitude modulation and ring modulation.
- Level
- Adjusts the amplitude of the signal.
- Invert
- Inverts the signal, turning its phase upside down.
Aux Routing

The aux module is a utility module which is very similar to the mix module. The only difference is, that instead of automatically routing itself and using the signal coming from the modules above, it expects you to route its input to it using the audio rate modulation system.
You can use the aux module to send audio to different parts of the generator stack, even to a different group. The aux module mixes its output onto the signal coming from above, much like a generator module. For technical reasons, the aux module adds one sample of latency to the signal.
The level and invert parameters work in the same way as in the mix module
Envelope Output

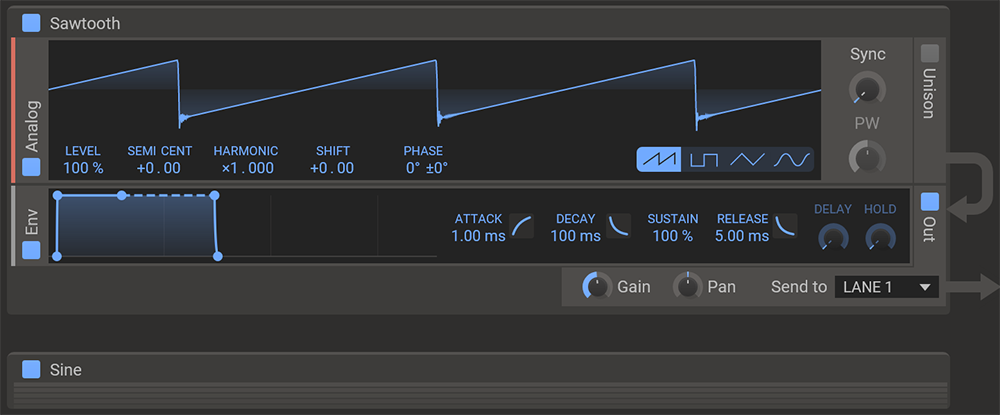
The output envelope module is an output module which does two things. First off, it applies an amplitude envelope to the incoming signal. Secondly, it can send the enveloped signal on to other parts of Phase Plant. You will need at least one output module in the module stack to be able to actually create any sound with Phase Plant.
The Envelope Output module uses a standard Kilohearts envelope. The Out toggle is enabled by default and routes any output to effects lane 1. The output can be turned off completely, in which case the output will not be heard, but may be used for modulations.
- Gain
- Changes the volume of the sent signal.
- Pan
- Pans the sent signal left or right.
- Send to
- Selects what bus to send this output to. This can be either one of the effect lanes to the right of this one, or straight to the master bus, or to the sideband bus which can be used as a sidechain input in Snapins that support it.
Curve Output

The output curve module is another output module and it's quite simlilar to the envelope output described above. Instead of an envelope it uses an editable curve with a set length for volume shaping.
The curve selector lets you choose from dozens of curves, all logically sorted in folders. Those curves can be tweaked in the curve editor available by clicking the the 'pen' button.
The curve graph has two handles that allow you to set loop points within the curve, while the loop symbol lets you select the desired loop mode.
The Out toggle is enabled by default and routes any output to effects lane 1. The output can be turned off completely, in which case the output will not be heard, but may be used for modulations.
- Gain
- Changes the volume of the sent signal.
- Pan
- Pans the sent signal left or right.
- Send to
- Selects what bus to send this output to. This can be either one of the effect lanes to the right of this one, or straight to the master bus, or to the sideband bus which can be used as a sidechain input in Snapins that support it.
Generator Groups
 Kilohearts plugins use groups for organizing your modules, and it's possible to rename groups for better readability of your work. Where grouping Snapins or Modulators is mostly a cosmetic thing, grouping the modules in the generator section has additional functionality. It is also not possible to place any generator module outside of a group.
Generator groups are used to divide the generator stack into different logical units. The group header breaks the automatic routing of modules, and an audio signal will never automatically flow between two different groups. You can however route audio between groups using the audio rate modulation system.
A common use case for generator groups is to create layered sounds, where each layer lives in its own group and has its own output modules. It can also be useful to create groups for modules that act as modulation sources, so that they are isolated from the modulation targets that they act on.
All types of groups can be moved and copied as a whole by dragging and dropping. Hold ctrl or command while dragging to make a copy.
Audio Rate Modulation
 Phase Plant support audio rate modulation between all the modules in the generator area. This can be used to create FM patches and other interesting sounds.
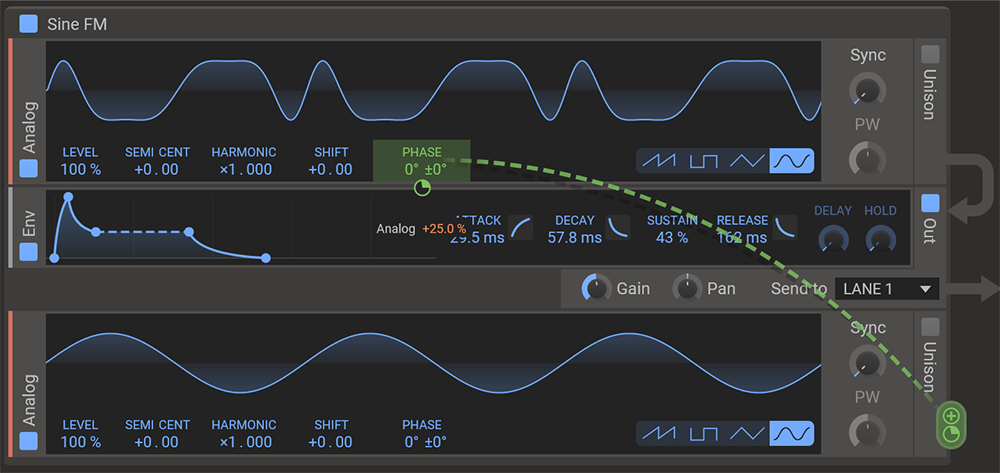
To set up an audio rate modulation, hover over the module you want to use as a source. A green circle with a plus symbol will appear on the right hand side of the module. Click the plus symbol to enter modulation mode. Other green plus symbols will now appear on all viable targets. Simply click and drag on the plus icon of the parameter you wish to modulate. After a modulation has been set up, the target will turn from blue to green to show that it is being modulated.
There is some slight confusion around the term FM as it has been adopted by the industry. The term often refers to Phase Modulation which doesn't really abbreviate to FM. Here is a short guide to understanding the various flavors of audio rate modulation in Phase Plant:
- Classic FM
- Modulating the Phase value of a generator gives you the classic FM effect. Modulating the phase has the benefit of never causing your generator to go out of tune.
- Linear FM
- Modulating either the Harmonic multiplier or the Shift value creates two different types of linear FM. It is preferrable to modulate the Harmonic because it will create the same resulting waveform for all played pitches. If your modulation source has a DC component (it's not centered around 0) then Linear FM will casue the target generator to go out of tune.
- Ring Modulation
- Modulating the Level of a generator will multiply the source and target waveforms together. This is also known as Ring Modulation.
- Exponential FM
- Modulating the Pitch value results in exponential FM. This method of modulation is hard to control and almost always causes your generator to go out of tune. But it has uses, for example using a slow source modulator to create a vibrato.
Effect Lanes
 Phase Plant leverages the Snapin ecosystem of effects to bring a wide and ever expanding range of effects to its effect section. After sound has been produced by the generator area, it is sent to one of three effect lanes, which in turn can be routed to either process the audio serially or in parallel.
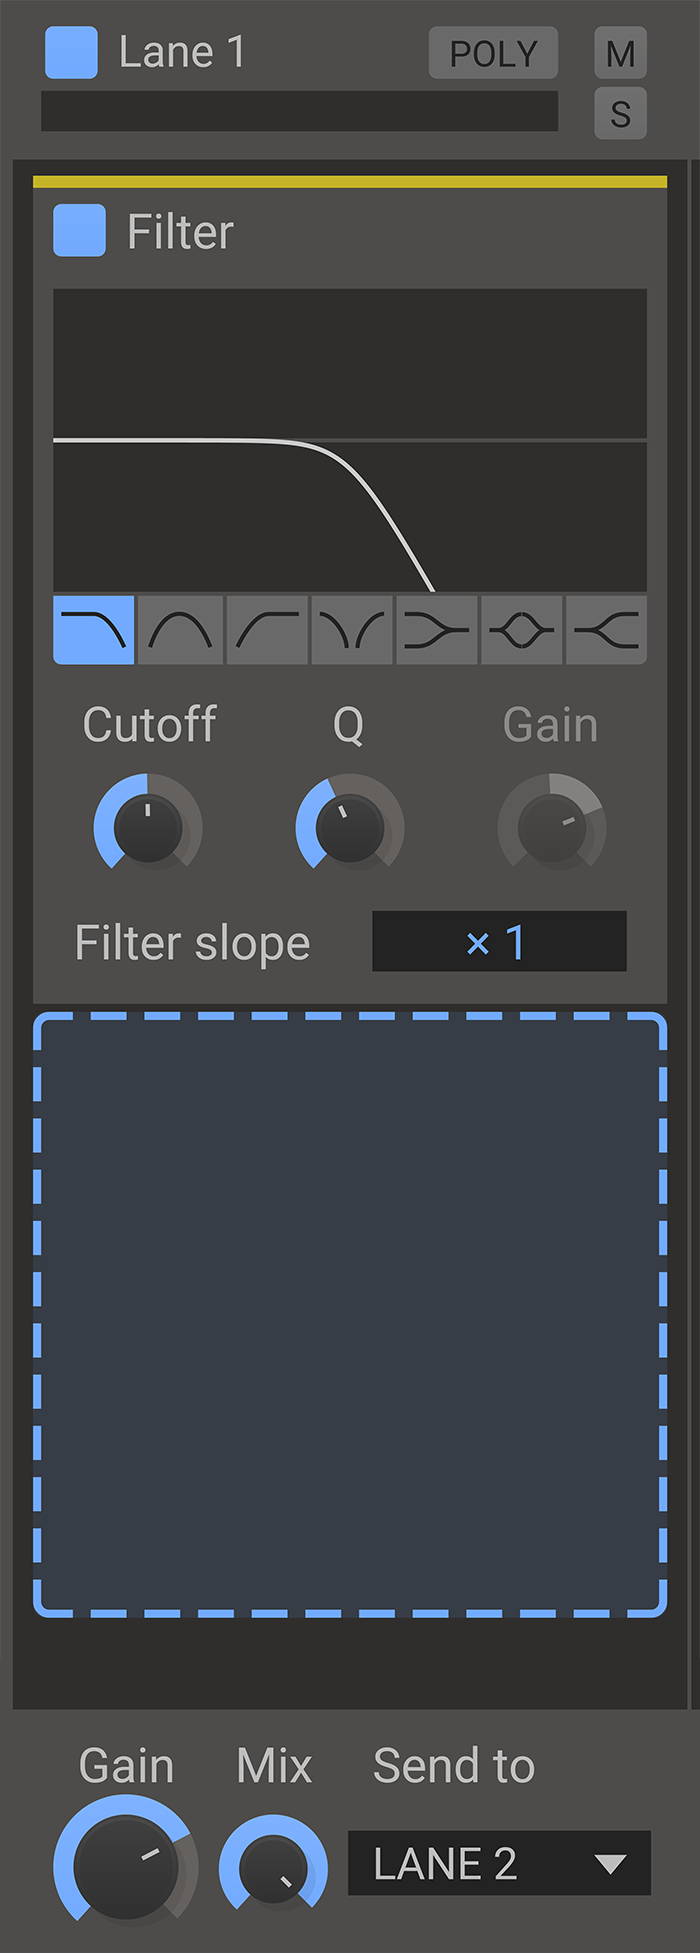
Lanes are divided into three parts. The lanes are remeniscent of the lanes in the other hosts, but there are a few unique features in Phase Plant:
- Poly button
- One unique feature of Phase Plant is that it allows all Snapin effects to run in polyphonic mode, where the effects processing is done for each voice separately instead of on all voices mixed together. Polyphonic mode is enabled on each lane separately by clicking this button so it lights up. For technical reasons, polyphonic mode can only be enabled on the lanes in order from left to right. In other words, if lane 2 is polyphonic then lane 1 also has to be.
- Mute button
- A toggle switch for muting the lane.
- Solo button
- This toggle button will mute all other lanes.
- Gain
- Changes the volume of the output of the lane.
- Mix
- Adjust the output mix of the lane between completely unprocessed at 0% to fully processed with Snapins at 100%.
- Send to
- Selects what bus to send the result of this lane to. This can be either one of the lanes to the right of this one, or straight to the master bus.
Voice Settings

Below the generator section are a few parameters that control some overarching behavior of Phase Plant.
- Glide Enable
- Enables glide, also known as portamento. This will make the pitch of a new voice slide from the pitch of the last one.
- Glide Time
- Adjusts how quickly a voice glides to the target pitch.
- Glide Mode
- When glide is set to always, it happens between all notes. If set to legato, glide only occurs when you play a new note while still holding the previous one, i.e. when there are no gaps between them.
- Global Unison
-
Some generators support unison mode (Analog, Sampler, and Wavetable). They all have individual unison settings. This global type of unison will create several parallel voices for every note you play. This includes the whole generator stack as well as any effect lanes which are set to polyphonic.
Unison is described in detail in the Unison chapter.
- Polyphony
-
You can use the polyphony setting to adjust how many voices can be active at once. If you play a note, and all available voices are already in use, the oldest and quietest voice will be recycled.
There are many reasons to keep this setting at a reasonably low number. Having too many voices ringing out at once can cause the mix to be muddy, and it can also have a negative impact on CPU performance. Setting polyphony to 1 will make your patch monophonic.
In monophonic mode, you can choose how notes are triggered. In retrig mode, every new note is always retriggered. In legato mode, new notes are not retriggered when you play a new note while still holding the previous one, i.e. when there are no gaps between them.
- Master Pitch
-
The master pitch controls the pitch of all generator modules at the same time. You can easily create a vibrato by modulating it with an LFO.
The Cents value enables you to fine-tune Phase Plant. There are 100 cents to every semitone.
- Bend Range
- The bend range adjusts the pitch bend range in semitones for the pitch wheel. This parameter is not stored in presets, but it is saved in your project as a global parameter.
- Master Gain
- The master gain fader sits at the very bottom right corner of the screen. It allows you to adjust the volume of your patch as a whole.
Unison Settings
Unison will create duplicate voices for your notes. Phase Plant supports unison in two different ways.
First off, there is oscillator unison, which is implemented in the analog oscillator, the sampler, and the wavetable editor. This is the type of unison you should reach for first, since it is resource efficient. When you enable unison on an oscillator, it will generate several waveforms at once internally. The output of the oscillator will be all waveforms mixed together, so if you use it as a modulation source, this is what you will get as well.
The second type of unison is global unison, which you enable below the generator area. This includes the whole generator stack as well as any effect lanes which are set to polyphonic. Global unison allows you to add unison to FM patches and patches that require polyphonic effects.
- Unison Mode
- Phase Plant has several modes for how unison voices are created grouped into three types.
- Unison - Hard
- Plays all voices at the same pitch with a slight detune. All voices start at the same phase.
- Unison - Smooth
- Plays all voices at the same pitch with a slight detune. All voices start at different phases.
- Unison - Synthetic
- Plays all voices at the same pitch with a slight detune. Voice phases are evenly spread.
- Creative - Frequency Stack
- Each additional voice has its frequency shifted by a multiple of the original note.
Frequency Stack replaces the bias knob with range. The range parameter adjusts the multiplier, from -100% where all voices are the same, to 0% where multiples are [2, 3, 4, 5...].
- Creative - Pitch stack
- Each additional voice has its pitch shifted by a multiple of the original note.
Pitch Stack replaces the bias knob with range. The range parameter adjusts the multiplier, from -100% where all voices are the same, to 0% where each voice is exactly one octave higher than the previous. At +100% each voice will be two octaves higher than the previous one.
- Creative - Shepard
- Creates a Shepard's tone. It spreads the voices octaves apart with the "farthest" notes being lowered in volume. The octave where the volume is the loudest is determined not by which note you play, but rather by the center knob, which replaces the bias knob. So, in this mode, each C note will sound the same, regardless of which octave you play it in.
- Chords
- There are several common chord modes. Each one will tune additional voices into the scale of that particular chord. The chords replace the bias knob with a balance control that shifts the volume of the voices to emphasize lower notes, or higher ones, respectively.
- Voice Count
- Number of voices to play simultaneously.
- Detune
- Amount of detune for each voice.
- Spread
- How much to pan the voices to create a wider stereo image.
- Blend
- Adjusts the balance between the detuned voices and the main voice.
- Bias
- Shifts the pitch of the flat and sharp voices. Turning this knob anti-clockwise will detune the detuned voices further away from the center pitch. Turning the knob to a plus value will tune them closer to the center pitch. This knob is replaced by Range for Frequency Stack and Pitch Stack, by Center for Shepherd, and by Balance for Chords (see above)