Slice EQ
User interface
Building your sound
Edit tool
Pan view tool
Zoom view tool
Reference tool
Edit mode & Stereo mode
Offset, Gain & Mix
Filter list
Spectrum view settings
Oversampling
Snapin mode

Overview
Kilohearts' Slice EQ is a powerful parametric equalizer, supporting six different filter types with full control over filter roll-off and Q. Stereo processing is possible with both Left/Right and Mid/Side modes.
Slice EQ has a workspace centric user interface which gives the user the option between either editing the filters visually in a spectrum view, or controlling each filter parameter individually by turning knobs.
User interface
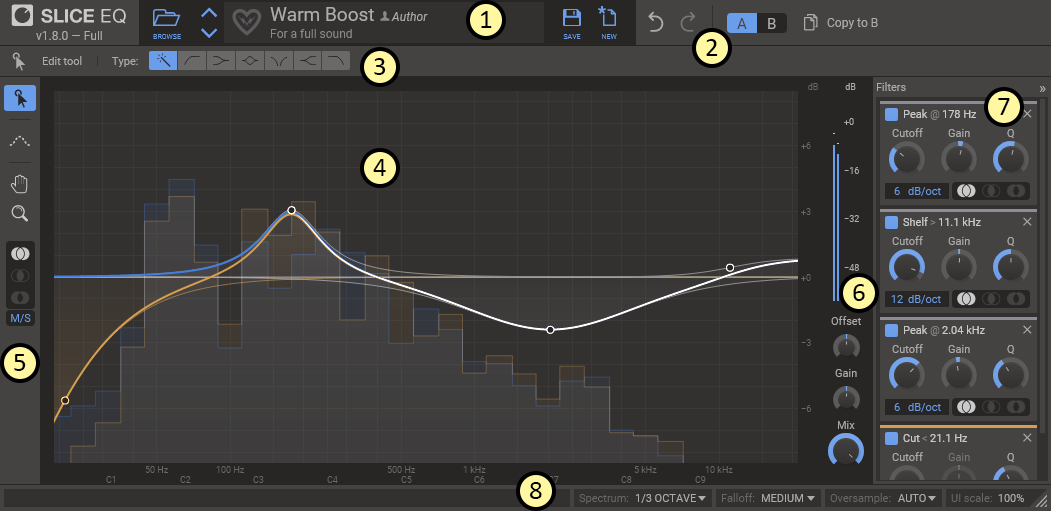
This is an overview of the plugin UI. It may look a bit overwhelming at first, but let's try to break it down a bit.
- In the top bar the name, author and description of the current patch is shown. By clicking the 'Browse' button you toggle the preset browser.
- The top bar also holds controls for Undo and Redo as well as the A/B configuration selector, which allows you to quickly switch between two different equalization setups to compare them.
- Just above the work area is a small bar containing options for the currently selected tool.
- In the middle of the UI you will find the main work area. It shows all the filters curves and their combined equalization curve, as well as a real time spectrum analyzer of the processed audio.
- To the left of the main work area you will find a toolbar with small selection of tools. It also holds controls for which stereo channel you are editing, and whether the equalizer works in L/R or M/S mode.
- In the rightmost part of the work area you will also find a large VU meter measuring the overall volume of the processed audio, together with controls for overall gain and dry/wet mix.
- To the right of the work area is a list of all the filters in the current patch. This list is hidden by default and can be expanded by clicking on the panel labelled Filters or right-clicking a filter handle.
- The very bottom of the window holds the status bar, which gives you tips about whatever your mouse is over at the moment. It also has controls for changing the appearance of the spectrum, changing oversampling, and resizing or scaling the UI.
Building your sound
A parametric equalizer, like Slice EQ, works by combining the effect of several simple filters into a complex equalization curve across the whole spectrum. Slice EQ supports the following 6 different filter types:
- Peak
- Boosts or attenuates sound around a certain frequency.
- Low & High Shelf
- Boosts or attenuates sound below or above a certain frequency.
- Notch
- Completely cuts out sound around a certain frequency.
- Low & High Cut
- Completely cuts out sound below or above a certain frequency.
For each filter, the following parameters can be controlled independently:
- Cutoff
- The center frequency for the filter. For example, the peak filter boosts or attenuates sound close to this frequency.
- Gain
- How much the filter boosts or attenuates the sound. Not available for Notch and Cut filter types.
- Q
- Adjusts the bandwidth of the filter. Increasing Q will create a sharper peak around the cutoff frequency.
- Roll-off
- The roll-off, measured in decibels per octave, dictates how sharp the transition from stopband to passband is for a filter.
Edit tool
 The first tool in the toolbar is the edit tool, and this is what you will use most of the time to add new filters and edit them.
To add a new filter, first select the filter type from the palette in the tool options, then click and drag the zero decibel line to add a new filter of that type. When the magic wand icon in the filter type palette is selected the filter type will be decided automatically depending on where on the frequency axis you click. A small icon above the mouse cursor will show you what filter type will be added.
Filters are edited by dragging their handles. When dragging a handle left and right you will change the cutoff frequency for that filter. When dragging up and down you will change either the gain (for peak and shelf filters) or Q (for cut and notch filters). To change Q for any filter type, hold the Alt key while dragging, or scroll the mouse wheel while hovering a handle with the mouse cursor. Adjust the roll-off by holding the Ctrl key and dragging up and down. To increase precision while dragging any parameter hold the Shift key.
The Q of High & Low Cut filters will snap to a value of 0.707, or about -3 dB, when dragging their handles. This is the Q value where the filter cuts as steeply as possible without overshooting and boosting any frequency. Additionally, High & Low Cut filters with a Roll-off of 6 dB/octave will have their Q locked to this value for technical reasons.
Several filter handles can be selected at once by clicking and dragging a selection rectangle around them. They can then be dragged together.
To remove one or more filters you must first select them and then delete them by pressing the Delete key on your keyboard.
Pan view tool
The pan view tool is used to pan the viewport along both the frequency and the gain axis. Simply click and drag to pan the view.
It is also possible to pan the view with any tool selected by clicking and dragging on the axis labels below and to the right of the viewport.
Zoom view tool
The zoom view tool is used to zoom the viewport along both the frequency and the gain axis. Simply click and drag to zoom the view.
It is also possible to zoom the view with any tool selected by scrolling the mouse wheel when hovering the axis labels below and to the right of the viewport.
Reference tool
The reference tool allows you to display an overlaid spectrum of another sound in the main work area. This can be useful in many ways, for example when trying to match the equalization curve of one song to another one, or during mixing when you want to avoid having two tracks clash in the same frequency range. Reference spectrums can be recorded and and later loaded from profiles which can be easily shared between different sessions.
The reference data can come from many different sources:
- Off
- Turns off the reference spectrum.
- Sidechain
- Displays the spectrum of the sidechain input in real time. (See our guide to setting up sidechains in all DAWs here)
- Factory profile
- Load one of the reference profiles bundled with the plugin.
- User profile
- Load one of the reference profiles you saved earlier.
- Create profile from file
- Create a reference profile from audio in a wav file.
- Record
- Record the current (main or sidechain) input to a profile.
Edit mode & Stereo mode
 Below the tools in the toolbar you will find controls for handling equalization in stereo.
At the bottom is a dropdown that lets you choose if the equalizer works in Left/Right or Mid/Side mode. The Left/Right mode will let you apply different equalization to the left and the right channels. The Mid/Side mode, on the other hand, will let you equalize the mono content (mid) separately from the stereo content (side).
On top is the edit mode selector. It lets you choose what channel to edit with the edit tool. By default it is set to "both channels", but you can change it to left, right, mid, or side to only edit that channel. Instead of clicking, you can also toggle the current edit mode with the Tab key.
Offset, Gain & Mix
In the bottom right corner you will find the Offset, Gain and Mix knobs.
The Offset knob shifts the frequency of all filters, making it easier to do interesting sweeps or using the EQ as a custom filter within a Snapin host like Snap Heap, Multipass or Phase Plant.
The Gain knob adjusts the overall gain of the equalizer. You can use this to compensate for your equalization inadvertently making the overall volume louder or softer.
The Mix knob scales the Gain parameter of all filters, scaling it down to 0 dB at 0% mix. Low cut, high cut and notch filters are not affected.
Filter list
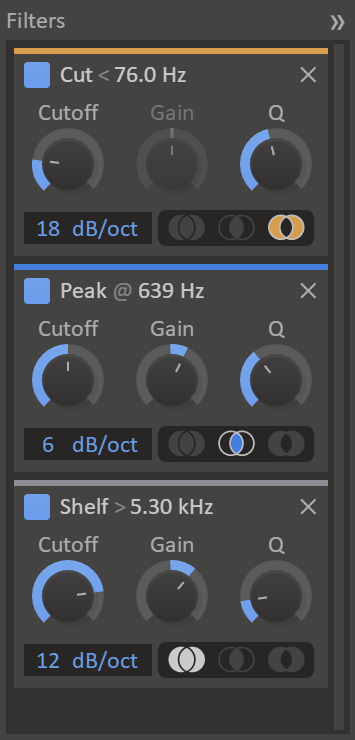 The filter list is found at the far right part of the user interface. The list is hidden by default and can be expanded by clicking on the panel labelled Filters.
The filter list gives you access to each parameter of every filter via a knob. You can also bypass filters in this list by clicking on the toggle button in the top left corner of each filter. Filters can be removed by clicking the X button in the top right corner.
Spectrum view settings
In the status bar you will find two dropdowns which can be used to tune the look of the spectrum.
- Spectrum mode
- Adjusts the frequency resolution of spectrum analyzer. Select between octave or 1/3 octave bars, and exact which shows a continuous curve.
- Falloff
- Adjusts how quickly the spectrum falls off to zero when the sound goes silent.
Oversampling
The equalizer can optionally oversample the signal in order to provide filter responses shaped closer to their analog prototypes. By default the oversampling is enabled automatically when the sample rate is low enough. You can override this behaviour to force oversampling on or off using the dropdown in the status bar.
Snapin mode
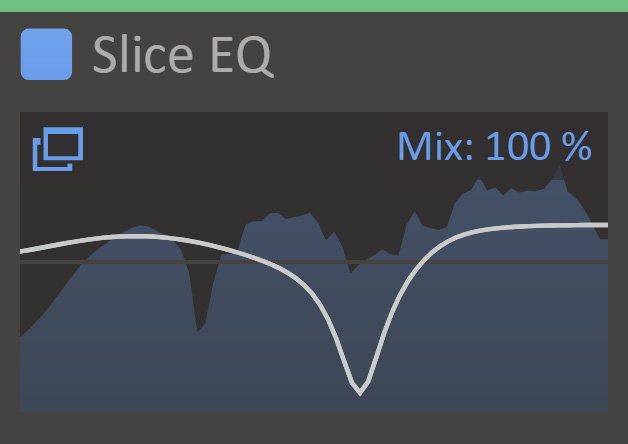 Slice EQ can also be loaded as a Snapin in Snapin hosts like Snap Heap, Multipass or Phase Plant. In this mode, the Snapin interface shows a preview of the EQ curve, along with Offset, Gain and Mix knobs. At the top, up/down arrows can be used to scan through presets and a full browser can be opened by clicking the preset name. To edit the current patch, press the pen icon. This will open the full Slice EQ interface in a separate window.