Wavetables
Wavetable Editor
Tools
Selection Tool
Morph Tool
Pen Tool
Brush Tool
Wave Tool
Harmonic Edit Tool
Filter Tool
Sample Conversion
Effects
Fixes
Overview
 Wavetables are a series of waveforms of equal length comprised into a list, where you can select one active waveform at a time. Each individual waveform is referred to as a frame. If you modulate the current frame you have a great way of modifying the waveform during playback to get all sorts of interesting effects.
Wavetables are most commonly associated with “Wavetable Synthesis”, as with the Wavetable Oscillator in Phase Plant. However, they can be used in other ways, such as in our unique LFO Table modulator.
Kilohearts plugins come with a big selection of Factory wavetables for many possible uses.
Wavetable Editor

Kilohearts offer a very capable wavetable editor built in. You can use it to edit any wavetable, or even to create novel wavetables from scratch. The wavetable editor also has a powerful tool for converting samples to wavetables.
To launch the wavetable editor, click on the little pen button next to the wavetable selector on the wavetable oscillator or anywhere wavetables are used. This will allow you to edit the currently loaded wavetable.
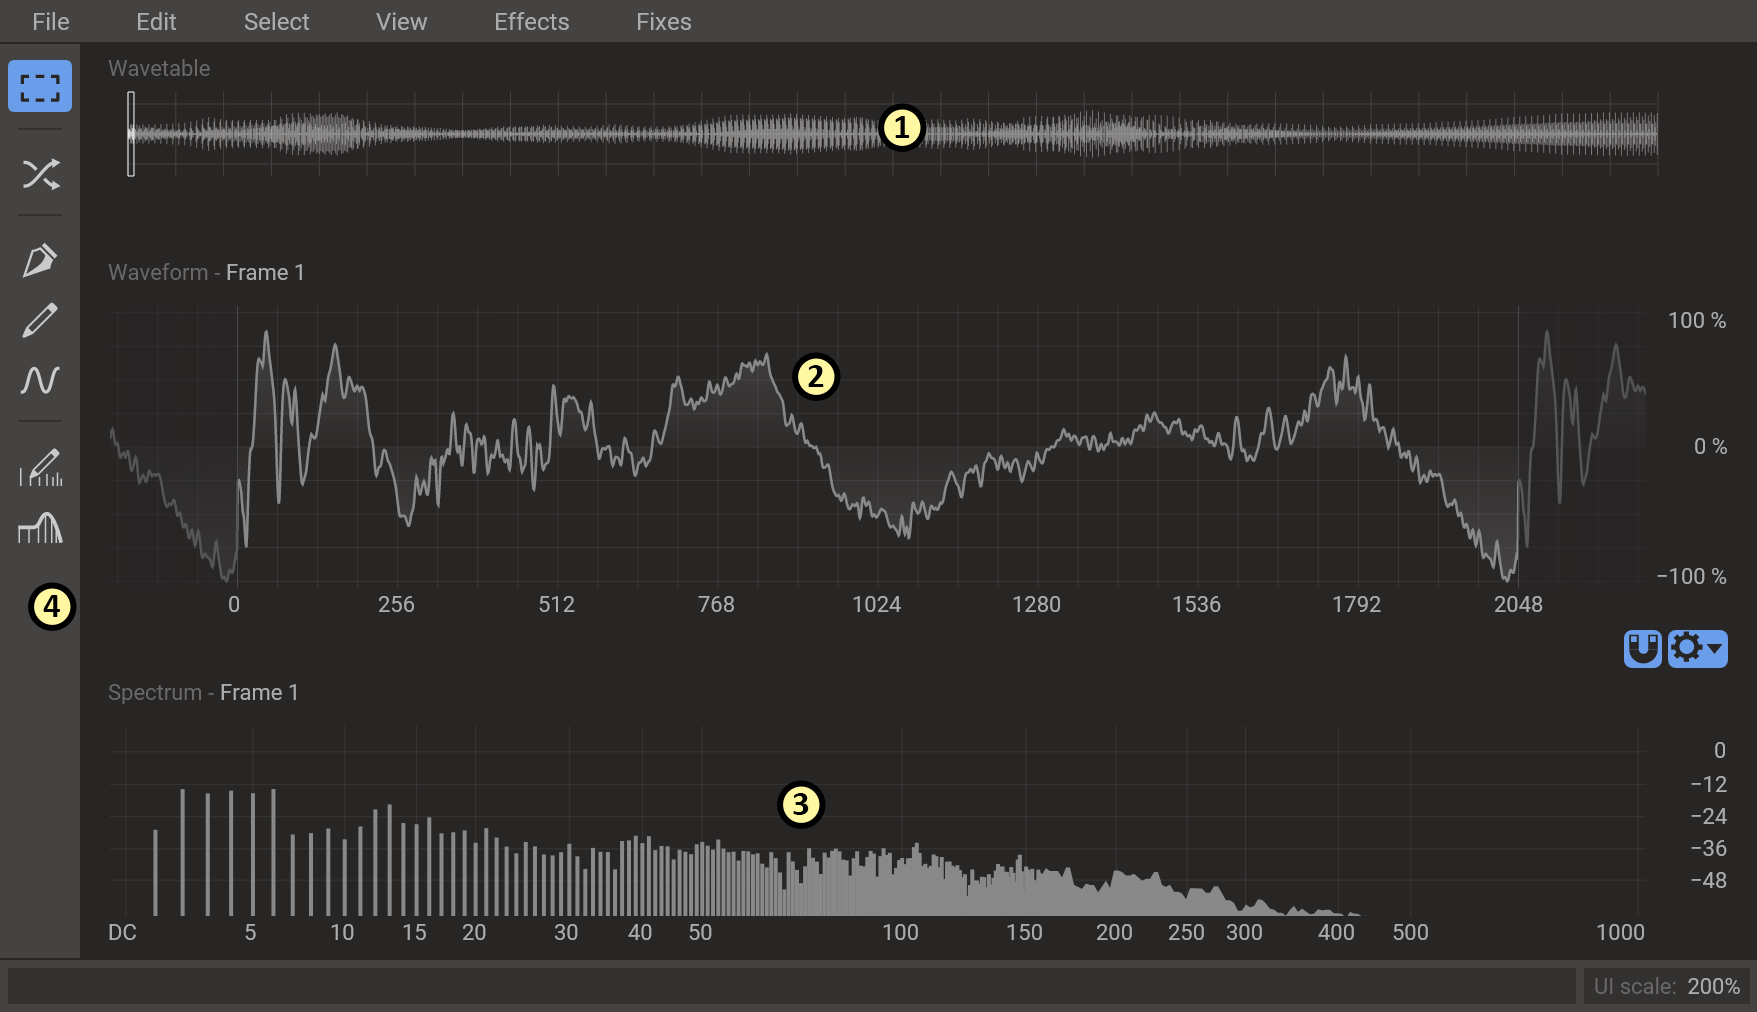
- At the top of the screen, you will see a miniature version of the whole wavetable. You can use this view for navigating between frames, and as we will see later, work with keyframes inside tools.
- Below the wavetable view is the waveform view. This shows the waveform of the currently selected frame.
- Below the waveform view is the spectrum view. Here you can see the magnitude of all partials for the selected frame.
- At the left side of the screen is the toolbar. You can enable different tools here. By default the selection tool is enabled.
You can pan and zoom the waveform view and the spectrum view by clicking and dragging or scrolling the mouse wheel on the horizontal and vertical axis.
Tools
Most of the tools in the wavetable editor are modal, meaning that you enter a special mode when you enable the tool. When you have a modal tool enabled, a tool options bar will appear at the top of the screen, under the menu bar. The tool options bar may contain some options and parameters for the tool. For the duration of the mode you can make several different non-destructive edits using the tool. The changes you make will affect the sound that you hear as you play, even while editing.
When you are happy with the result, click on the button labelled done in the tool options bar to commit your changes to the wavetable. Activating a different tool will also commit your changes. Clicking on the cancel button will discard your changes.
Most modal tools in the wavetable editor support keyframe animation. This powerful concept will allow you to create movement across the whole wavetable with a single application of a tool. Place keyframes on a wavetable by clicking on the frame in the wavetable view and starting to make edits with the active tool. A blue marker will appear under the wavetable to show that a keyframe is placed there. You can drag and drop keyframes or delete them by double clicking.
Tools that work on a section of the waveform or the spectrum often have handles that appear above the view that let you crossfade the edges of the edited region.
Selection Tool
The default tool in the wavetable editor is the selection tool. It allows you to select parts of the wavetable, waveform or spectrum and copy and paste it. When pasting a piece of the waveform or spectrum, a keyframe-enabled mode will be entered where you can transform the pasted section.
Morph Tool
The morph tool allows you to crossfade between different frames in the wavetable. Simply place a keyframe on each frame you want to crossfade, and the intermediate frames will be filled in with a crossfaded version of the two neighboring keyframes. You can either do a linear or spectral morph.
Pen Tool
The pen tool lets you draw a curve between several control points, which can be animated across the wavetable using keyframe animation. The way you interact with the curve is similar to the LFO editor.
The view can be zoomed by using the scroll wheel on the horizontal axis below the curve, and panned by clicking and dragging on the axis. The magnet button at the top right toggles snapping to the grid. Finally, clicking and dragging either of the 3-line symbols at the top allows you to adjust the grid resolution along both the vertical and horizontal axis.
Brush Tool
The brush tool lets you freehand draw on the waveform view. Each frame you draw on will become a keyframe. Inbetween frames are interpolated linearly from the keyframes.
Wave Tool
The wave tool lets you insert a standard waveform into a wavetable frame. The phase, frequency, and positon of the inserted wave can be adjusted and keyframe animated.
Harmonic Edit Tool
The harmonic edit tool will let you directly edit the partials in the spectrum view by freehand drawing. The result is interpolated similarly to the brush tool. If you zoom in, small round widgets will appear under each partial which represent the phases of the partials. Click and drag these widgets to adjust the phases.
Filter Tool
The filter tool lets you apply a filter to the wavetable. Standard filter types are supported, and the slope of the filter can be set freely. All parameters can be animated across the wavetable using keyframes. This allows you to bake filter sweeps into your wavetables.
Sample Conversion
A powerful feature of the wavetable editor is its ability to convert a sample to a wavetable. Drag and drop a sample onto the wavetable editor or browse for a sample using File > Create from Sample to start a conversion.
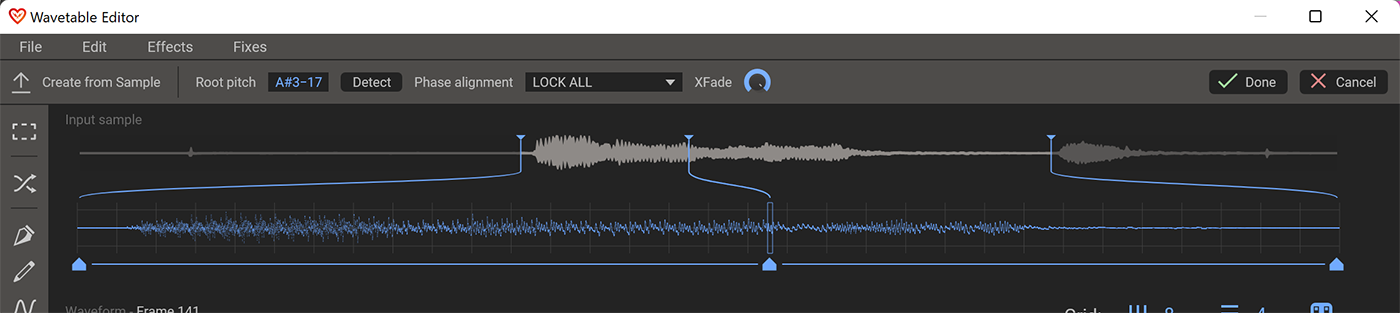
The conversion is implemented as a keyframe animated modal tool. The old wavetable data is still present underneath the sample data you are importing, and you can blend between them using the mix parameter.
When you have selected a sample to use, a visual representation of the input sample will be added to the UI over the wavetable view.
For conversion to work well, the tool needs to know the root pitch of the sample. It will try to detect this automatically, but you can also edit the root pitch manually in the tool options bar. The pitch of each keyframe can also be offset from the root pitch by using the pitch bend parameter for samples where the pitch is not static. Playing around with the pitch bend can also create interesting effects similar to a formant shift.
Adjusting the source parameter for keyframes will let you adjust which location of the sample they map to.
Since it is unlikely that the root pitch is spot on for the whole sample, some phase drift will occur. The tool mitigates this problem by trying to align the phases. You can choose between a few different strategies that can be used for this task. Try them out to see which one performs best for your use case.
Effects
In the effects menu at the top of the screen you will find many interesting effects that you can apply to your wavetable. All of these effects are modal tools whose parameters can be keyframe animated.
- Automatic EQ
- Applies equalization to the wavetable frames which will try to flatten out the spectrum somewhat to a gentle slope, while still preserving the finer detail in the spectrum. You can use this to clean up a wavetable where different frames vary wildly in spectral energy.
- Frame Blend
- Frame blend weighs together adjacent frames. One example: Frame 5 will after processing become a mixture of frames 2, 3, 4, 5, 6, 7 and 8. The amount of frames to be mixed can be set with the "Distance" parameter.
- Comb Filter
- Applies a comb filter. Since this effect is implemented in the frequency domain, it can do some things that normal comb filter can't, like warping the comb pattern in the spectrum.
- Disperse
- This effect is similar to the Disperser plugin. It will add a phase shift to all partials which increases in amount for higher partials.
- Distortion
- A versatile distortion effect with adjustable Drive, Bias, and Mix. It has six distortion types selectable from a dropdown menu.
- Phase Offset
- Adds a phase offset to the wavetable frames. You can blend between a linearly frequency dependent phase shift, which simply offsets the waveform, to shifting every partial by the same angle.
- Power Sync
- Creates a novel sync-like effect to the wavetable.
- Rectify
- Rectifies the waveform, i.e. flips the negative part of it so it's all positive.
- Reset Phases
- Resets the phases of all partials to a specified value. The effect can be blended.
- Self FM
- Phase modulates the waveform with itself as the modulator.
- Sine FM
- Phase modulates the waveform with a sine wave as the modulator.
- Squarify
- Removes all even harmonics, mimicking the harmonic profile of a square wave, hence the name.
- Sync
- Applies an effect to the waveform similar to oscillator sync.
- Tilt EQ
- Applies a sloped EQ curve to the waveform.
Fixes
In the fixes dropdown menu you will find some commands that can help you fix problematic wavetables. These are not modal tools, and will apply their effect immediately.
- Normalize
- Removes DC and normalizes the volume of all frames, measured using RMS. Also makes sure that no peak goes over 100%.
- Remove DC
- Removes any DC from the wavetable.
- Invert
- Invert Time plays the waveform backwards and Invert Amplitude inverts the phase.
- Align
-
Align Fundamentals sets the phase of the first harmonic in all frames to be identical to the selected frame. Align All Phases sets the phase of all harmonics to be identical to the selected frame. Align Frames phase-shifts each frame without changing the phase ratio of its harmonics, so that they get maximum correlation to the selected frame.
The point of these three fixes is to reduce disturbing phase effects when modulating the frame in the wavetabler oscillator. In the effects menu, there is also a related tool called Reset Phases which sets the phase of all harmonics to a specific value.